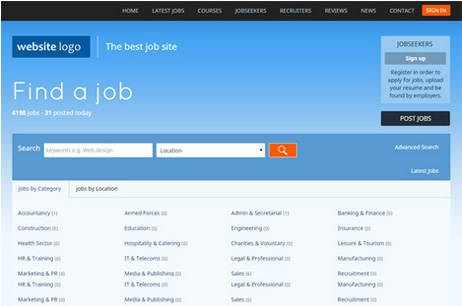
Jobs Portal Version 3 - installation instructions and help topics
1. Installing the website
2. Configuring the website
2.1. Configuration options
2.2. Changing the locations
2.3. Setting the website pricing and packages
2.4. Custom fields
2.5. Jobseeker files, sign up and invoices settings
3. Website structure and content management
3.1. Structure management
3.2. Modifying the content of the pages
3.3. Custom server side forms
3.4. Languages and language files
4. Front site templates management
4.1. Templates overview
4.2. Adding new templates and modifying the existing ones
4.3. Custom HTML tags
5. Advertisements
5.1. Creating banner areas
5.2. Banners
5.3. Featured listings and employers
5.4. Adding third-party ads like Google AdSense or similar
6. Administration panel
6.1. General Overview
6.2. Main pages in the administration panel
6.3. Administration panel users management
7. Employers admin space
7.1. Overview and pages in the employers admin space
7.2. Credits
7.3. Sub accounts
7.4. Profile Management
7.5. Packages, listings and banners
7.6. Jobseekers search and applications
8. Jobseekers admin space
8.1. Overview and pages in the jobseekers admin space
8.2. Profile and job preferences
8.3. Resume management
8.4. Documents and job alerts
1. Installing the website
You may find below information about the Jobs Portal integrated setup, the description of all the steps, possible errors and troubleshooting information.
Step 1 - Welcome screen and Jobs Portal End User License Agreement
In this first step you'll be able:
to see the general setup welcome message
to read the Jobs Portal end user license agreement
In order to continue to the next step, you'll have to agree with the Jobs Portal end user license agreement by checking the check box (I agree ...).
Troubleshooting
1. I can't find the Continue button and I can't proceed to the next step?
By default the Continue button in this step is hidden and it becomes visible when you click on the check box (I agree ...). If you don't agree with the Jobs Portal end user license agreement, the Continue button will not show up and you'll not be able to proceed to the next step.
Step 2 MySQL server access information
In this step you'll have to provide the access information for the MySQL server (server name, mysql user and password) where you would like to setup the main Jobs Portal database. The setup needs this information in order to connect to your server install the MySQL database on it.
In this step, you'll be asked for:
MySQL Server the server where you plan to install the database, usually localhost for most of the hosting packages
MySQL User / MySQL Password a valid user account for the MySQL Server
If you are not sure for these settings, please contact your hosting provider or log in to your hosting package control panel, where usually this information can be found on a page called MySQL or Databases.
After you enter these values and click on the Continue button, the setup will try to connect to the MySQL server with the username and password you entered. If any of values aren't correct (the address of the MySQL server or the MySQL username and password), then an error message will be displayed and you won't be able to continue until you enter the correct values.
Troubleshooting
1. After you click the Continue button you receive an error message in red saying Server doesn't exist or access is denied.
If this is the case, please check once again the values you have entered. If the problem persists:
- make sure that your MySQL server is running and that this account is valid
- contact your hosting provider and ask him for the MySQL settings for your hosting account
Step 3 - Setup of the main Jobs Portal database
In this step you'll be asked if you would like to create a new database for Jobs Portal or use an existing one. We recommend that you create a new database however some hosting packages are limited to only one database or don't allow php code to create a new database (they should obligatory be created first from the hosting package control panel), that's why we provide the second option - to use an existing database. Please note that the tables in the Jobs Portal database are prefixed, so there should be any problems if you already have another tables in your database.
If you choose the first option, to create a new database, you'll be asked to enter the name of the database. We recommend you to use a name which will be easy to distinguish, like for example jobs_portal. Be aware that when choosing this option, the MySQL user you have provided in the previous step should have the rights to create new databases on the MySQL server. If this is not the case, the database creation will fail and such error will be displayed on the screen.
If you choose the second option, the Jobs Portal database tables will be created in the database chosen by you. All the tables which will be created will have a prefix websiteadmin_, no data from the existing database will be deleted.
Troubleshooting
1. I have chosen the option to create a new database but when I click on Continue, I get an error message colored in red and I can't proceed to the next step, why?
- make sure that your MySQL user has CREATE DATABASE permissions on the MySQL server
- make sure that you don't have already a database on your server with the same name as this one you entered for name of the new database
2. I have tried to use the second option, to use an existing database, but I receive an error message saying that the table websiteadmin_admin_users already exists
- this means that you have previously installed the script in this database, so you may either use a new database or delete the old script tables and then continue with the installation
Be aware that in this step the setup creates also the script configuration file. If the process running PHP on your server for your hosting package doesn't have right permissions in the folder where you install Jobs Portal you'll receive the following message in the interface:
The process running PHP on this computer doesn't have permissions to create and write the configuration file in the main web folder. You need to create it manually the content will show up in the screen. You need to copy / paste it in a file jobs_config.php and upload it in the main web folder (the one in which you uploaded the real estate files). So you could either upload it with FTP or use the File Manager in your hosting package control panel to save the jobs_config.php file.
If you experience troubles when doing this or have any additional questions, please don't hesitate to contact us.
Step 4 Installation successful screen
If you reached this step, Jobs Portal has been installed successfully on your server/hosting package.
2. Configuring the website
2.1. Configuration options
The Settings->Configuration options in the administration panel provides functionality to change the different options for the front site.
You may find below a list and description of the different configuration options.
The currency symbol shown on the website
By default this setting is set to the US dollar sign $, but you may change it to another one you prefer (like CHF or ). This will change the currency symbol displayed next to the prices on the website.
This applies for all the prices of the listings on the website, pricing for posting listings and banners etc.
Accept PayPal
This setting has two possible values YES or NO. If set to YES, will enable the PayPal payments on the website or with other words, will allow the website owner/administrator to use the PayPal system to charge the users for posting listings or banners on the website.
PayPal Currency Code
The PayPal currency code if the PayPal system is enabled. By default it's set to USD (US dollars), but can be changed to any other valid PayPal currency code like EUR, GBP etc.
PayPal Account
When the PayPal system is enabled, in this field, the administrator/website owner has to enter the PayPal account (registered PayPal email address) he would like to use to charge the users on the website.
Accept 2checkout
This setting has two possible values YES or NO. If set to YES, will enable the 2checkout payments on the website or with other words, will allow the website owner/administrator to use the 2checkout system to charge the users for posting listings or banners on the website.
2checkout Seller ID
When the 2checkout system is enabled, in this field, the administrator/website owner has to enter the 2checkout SID (Seller ID) of the 2checkout account he would like to use to charge the users on the website. The seller id can be obtained from the 2checkout website (during a new registration for the new users) or from the admin panel for the registered ones.
Accept Cheques
If set to YES, then cheques will also be accepted in order to charge the users. The payments by cheques have to be validated manually by the administrator from the administration panel when the cheque is received.
Address for the Cheques
In this field the administrator has to enter the address, which has to be used for the cheques to be sent if the cheques payment options is enabled on the website.
Enable ZIP field
If set to YES, will show ZIP field on the website (for the jobs listing and also the users). Please note that if you prefer so, you could rename this field to Post Code or another name you prefer in the language file. For countries in which no ZIP or Post code is used, the field can be disabled (and removed from the website) by setting the value of this setting to NO.
Enable ZIP distance search
The ZIP distance search allows the users to search for jobs only within a specified distance of the ZIP code. By default this feature is enabled only for the USA, so for other countries it can be disabled by selecting NO for this setting.
Accept Bank Wire Transfers
If set to YES, then the bank transfer payment option will also be enabled on the website and bank wires will be accepted in order to charge the users. The payments by wire transfer have to be validated manually by the administrator from the administration panel when the wire transfer is received.
Bank Account Information
In this field the administrator has to enter the full information for the bank account to be to be used when the bank transfer payment option is enabled on the website.
Hide the Nationality Field
If set to YES, the nationality field will be hidden and won't show up on the jobseekers registration and profile modify page.
Date Format on the Front Site
By entering a valid PHP date format string, the administrator can change the format of the date displayed on the website.
Full information on the supported date format strings can be found on:
http://www.php.net/manual/en/function.date.php
Here are a few examples:
"F j, Y, g:i a" // March 10, 2001, 5:16 pm
"m.d.y" // 03.10.01
"j, n, Y" // 10, 3, 2001
"H:i:s" // 17:16:18
Send Email Notifications to the Users
By modifying the value in this field to YES or NO, the administrator can enable or disable the email notifications sent to the users (for new applications etc.)
Number of Job Categories per Row on the Home Page
By default this value is set to 3, which means 3 columns of categories per row will be displayed on the home page, but with this setting the administrator can change it to another number he may prefer.
Website Free for All Users
Setting this field to YES, will transform the website in a free website the employers will be able to post jobs for free on the website. This mean they won't have to make payments and purchase credits prior to post listings on the website.
Free Website Ads Expire after (days)
When the website is paid (default option), the administrator can specify the number of days in which the job listings will expire when creating the different packages (so packages with more days can be set also to be more expensive).
However when the website is set to free, the administrator doesn't have to create any packages, so he may use this setting to change the number of days in which the job listings will expire (the default value is 30, which means 30 days).
Multi Language Website
The multi language website can support more than one language and it shows the languages menu on the front site (allowing the users to choose the language they prefer).
For website loading speed optimization if you have only one language on the website, it's recommended to keep this setting to NO, otherwise you may switch to YES.
Setting the website to be not multi language will hide also the language selection menu on the front site.
Enable SEO Links
The search engines optimized links look like static html pages and have keywords in the url (which allows better indexing by search engines like Google).
In order to use the SEO links, the system will require the presence of the mod_rewrite module (for Linux / Apche or isapi_rewrite for Windows / IIS). If this module is not present on your server or hosting package, you could deactivate this feature by setting it to NO.
Allow Guest Applications
The guest applications feature allows the user who still didn't register on the website, to also apply for a job (by clicking on the guest apply button).
Use PayPal IPN to Validate Automatically the Credits Purchase
The paypal IPN (instant payment notifications) is a technique offered by paypal allowing to instantly validate and send information for the payment a user did on the paypal website. This feature can be used to automatically validate the credits purchased by the users (when set to: YES) or if the administrator prefers to this manually, he may change the value to: NO
Featured Ads Expire after (days)
The featured listings appear with different background and always on top of the search results. The users can choose to make their listings featured by paying a fee set by the administrator for that.
With this setting the administrator can control in how many days a featured listing will expire and convert back to a normal listing. The default value of this setting is 30, which means 30 days.
Search Results per Page
By changing the value of this setting, you can control how many results will show up on the front site when the users make a search or browse the listings per make etc.
The default value is set to 10.
Keep Statistics for the Front Site Visits
By setting the value to NO, no statistics will be kept for the front site visits (this also lowers the number of sql queries to be executed).
New Users Email Validation on Sign up
By default this setting is enabled and it forces the new users to validate their email address by clicking on an activation link, which is sent to them by email. If however the administrator would like to turn off this feature (so as soon as the users fill the registration form, they will be able to log in with their username and password), he can change the value of this setting to NO.
Forward by Email the Messages Exchanged by Users
When set to YES, the messages sent between the users in the system will be forwarded also to their email addresses.
Enable Front Site Cache
The cache can be used to increase the performance of heavy loaded websites. It stores as static html files the front site and blog pages so when another visitors open the same page within the cache expire time, the system shows the already stored content (without rendering again the page and without executing any new MySQL queries).
This setting can be used to activate or deactivate the front site cache.
Front Site Cache Expire Time (minutes)
If the front site cache is enabled, with this setting the administrator can set in how many minutes the files will expire.
Maximum Allowed Image Size
Using this setting the administrator can set the maximum allowed image size for upload by the vendors. The value has to be set in bytes.
Enable Autorize.NET Payments
This setting has two possible values YES or NO. If set to YES, will enable the authorize.net payments on the website or with other words, will allow the website owner/administrator to use the 2checkout system to charge the users for posting listings or banners on the website.
Authorize.NET Login ID
When the Autorize.NET system is enabled, in this field, the administrator/website owner has to enter the Authorize.NET login ID of the Authorize.NET account he would like to use to charge the users on the website.
Authorize.NET Transaction Key
When the Autorize.NET system is enabled, in this field, the administrator/website owner has to enter the Authorize.NET transaction key of the Authorize.NET account he would like to use to charge the users on the website.
Charge the Jobseekers
With the default payment system, the jobseekers and employers can sign up for free and the employers are charged when they post jobs or make them featured or post banners or search in the jobseekers resumes database. However there is an additional feature, which allows the administrator to charge also the jobseekers - when they apply for jobs. Every application can be charged one credit and the jobseekers will have to buy credits first in order to be able to apply for jobs.
Default Time Zone
With this setting the administrator can change the default time zone on the website. The time zone coming by default for most of the downloads is Europe/London.
List of the supported time zones can be found on: http://www.php.net/manual/en/timezones.php
Some examples of supported time zones are:
America/Buenos_Aires
America/Chicago
America/Los_Angeles
America/Mexico_City
America/New_York
Asia/Singapore
Asia/Tokyo
Europe/Berlin
Europe/Madrid
Europe/Moscow
Europe/Zurich
Allow Video Uploads
There is a default feature allowing the jobseekers to upload a video resume and the companies a video presentation. By default this feature is enabled (set to YES), but if you would like to deactivate and remove from the website this feature and not accept video files, you can set this setting to NO.
Maximum Allowed Video Size
If the video files upload feature is enabled, this setting allows to control the maximum allowed size of the video files to be uploaded.
Number of Featured Ads on the Home Page
The featured ads different from the regular one by its position in the search results (always on top), different background and a number of them show up in a special featured ads section on the front site. With this setting the administrator can control how may job listings will show up in this section. If there are more featured ads than this number, the featured ads will show up randomly.
Enable Facebook Login
If set to YES, will enable the possibility for the jobseekers to login directly with their facebook account or for the users, who didn't register on the job site, to skip the registration by using again their facebook account.
Facebook APP ID and Facebook Secret
To use the facebook login, the administrator has to register the website on facebook (this is a general requirement of facebook in order that the website can use the facebook login system).
The registration is simple and can be done on:
http://developers.facebook.com/setup/
The administrator needs to enter there the website url and on the next step see the Facebook APP ID and Facebook Secret and set them in these fields on the Settings->Configuration Options in the admin panel.
Accept AlertPay
This setting has two possible values YES or NO. If set to YES, will enable the alertpay payment system to accept payments on the website or with other words, will allow the website owner/administrator to use the alertpay system to charge the users for posting listings or banners on the website.
AlertPay Merchant Email
When the 2checkout system is enabled, in this field, the administrator/website owner has to enter the alertpay registered email address of the alertpay account he would like to use to charge the users on the website.
2.2. Changing the locations
The locations can be updated from the Settings->Regions page in the admin panel.
The new locations have to be entered as a list, one per line, with a leading number (it's not required that these are successive numbers).
Currently the system supports up to 4 levels of locations, the levels can be defined with the starting numbers, here is an example:
1. Main location
1.1. Sub location of the main location
1.2. Another sub location
1.2.1. Sub sub location
1.2.1.1. Level 4 location
2. Another main location
The sub locations can be list of countries / states / counties / towns or another hierarchical structure preferred by the administrator. For example:
1. Country 1
2. Country 2
3. Country 3
3.1. State of country 3
3.2.1. County in the state
3.2.1.1. Town in the county
3.2. State of country 3
2.3. Setting the website pricing and packages
Currently in Jobs Portal, a Credits system is used to charge the employers (and/or the jobseekers, if this option is enabled by the administrator).
The credits represent a way to simplify the employer's payments and instead of making multiple small payments (when posting jobs or make them featured or post banners or search in the database with jobseekers resumes) to allow them to purchase a number of credits corresponding to their budget and then use them to pay for the different services offered on the website.
The credits pricing can be set by the administrator from the Settings->Pricing page in the main administration panel.
When setting the credits and the pricing the administrator can set:
the price for 1 credit, so for example if the price for 1 credit is $0.50 then purchasing 60 credits will cost 60 * $0.50 = $30
the minimum and maximum number of credits that can be purchased (if the user tries to purchase a number of credits, which is lower or higher than these limits set, the system will automatically adjust the amount of credits to the minimum or maximum allowed number)
the price of credits to make a normal listing featured (the featured listings show up always on top of the search results and with a different background)
the price in credits to open/save a jobseeker resume
The price in credits for posting banners can be set when creating the banner areas and they can differ depending on the selected banner area and the types of banners supported in it (which can be different in size, number of banners in the banner area and its position on the front site template).
If the administrator/website owner would like to run a completely free website, he may turn off the payments and credits system from Settings->Configuration Options, by setting the value of FREE WEBSITE to YES.
Creating the employers listing packages
From the Settings->Packages page in the admin panel, the administrator can create the different listing packages for the employers .
The packages for the employers can differ by:
the number of listings included in the package
number of days in which the listings will expire
the price of the whole package in credits
2.4. Custom fields
The Jobs Portal allows the administrator to define additional fields for the jobseekers, employers and the job ads. The fields can be added directly from the admin panel and without making any modifications in the source codes.
Adding new custom jobseeker and employers fields
The custom fields for the jobseekers can be added from the Users->Jobseeker Fields page in the admin panel, while these for the employers, from the Users->Employers Fields.
For every new field the administrator has to enter its name, the size in pixels and the possible values if the field is a drop down selection menu.
If the possible values field is left empty, the the new added custom field with be a text box allowing the user to enter a text value.
The newly added fields show up after on the pages for modifying the profile (the Profile->Modify page in both the employers and jobseekers admin spaces) and also on the front site registration forms.
Adding new custom job ads fields
The new custom job fields can be added from the Jobs->Fields page in the admin panel. The fields are similar to the pages for adding new custom fields for the jobseekers and employers.
2.5. Jobseeker files and sign up settings
The jobseekers can upload different files from their admin space, these could be resumes or other documents like references etc. , which they can attach to their applications when applying for jobs.
From the Settings->Jobseeker Files page in the admin panel, the administrator can set the maximum number of files the jobseekers will be able to upload, as well as the maximum allowed size for one file.
By default when signing up, the users receive an welcome email having also a link allowing them to validate their email address and account. The administrator is able to manage the subject and text for these email messages from the Settings->Sign up page in the admin panel.
The default text of these welcome emails is:
Welcome to Jobs Portal!
Please click on the following link in order to activate your account:
[ACTIVATE_LINK]
In this text [ACTIVATE_LINK] is replaced by the system by the actual activation link for this email. Please note that if the website is configured to send email validation links (from Configuration Options), [ACTIVATE_LINK] should always be present in the text of the message.
2.6. Invoices settings
The invoices can be generated by the employers when they purchase credits from the Credits purchase history page in the employers admin space.
The invoices are in .pdf format, the administrator can set from the Settings->Invoices page in the admin panel their starting number, the company name, address and city, which will be shown on the website as well as the footer information.
3. Website structure and content management
3.1. Structure management
Changing the front site pages meta title and description
In order to change the front site pages meta title, keywords or description, the administrator has to log in in the admin panel and go to the Website->Management page.
On this page, he will see the available website pages as a tree. He has to left click with the mouse on a page in order to select it and then choose from the Context menu which will show up Page Settings.
A new page will show up containing various page fields including also the page meta title description. The administrator has to enter the new values and click Save.
Adding new pages to the website
The Jobs Portal admin panel offers the possibility to freely edit the website structure add, edit or delete the pages of the front site.
Please note that you need to define the website structure separately for the different language versions available (you could switch between the language versions by clicking on the corresponding flags in the back office).
In order to add a new page to the front site you need to use the form located at the bottom of the Website->Management page.
In this form, the administrator has to enter in:
- Link Text , the name of the link, which will show up in the main navigation menu
- Page Type, it can be either a main page or a sub page of an already existing page
- Title, the title of the page, which will show up in the title tag
- Meta Description, the meta description of the page, which will appear in the meta description tag to be used for search engines optimization purposes
- Meta Keywords, the meta keywords of the page, which have to be entered as a list and will appear after that in the meta keywords tag on the page, to be used for search engines optimization purposes
Changing the pages hierarchy
You can modify the front site pages structure using the form at the bottom of the Website->Management page.
The form there allows to make a page of the website either a main page or a sub page of an existing main page.
Changing the position of two pages
By changing the position of 2 pages, you'll change the order of the pages in the main navigation menu (for example replace the positions of the Home and About us pages).
Near every page on the Website->Management page, you could see 2 red arrows indicating the up and bottom directions, you have to click on them in order to change the position of the pages.
Please note that you can change the position of 2 pages only if they are on the same level in the website hierarchy (for example main pages, or sub pages of the Home page etc.)
Changing the front site main navigation menu style
You could choose between 2 main types of menus for the front site navigation menu. In order to switch between these types, you need to go to the Website->Navigation menu page.
The standard menu provides you the possibility to combine texts, styles and images and manage with ease complex multi levels menus.
The settings of the standard menu could be managed from the Standard menu → Settings page in the administration panel.
The Customized menu is designed to be used for more complex menu structures. In order to create a customized menu you could either enter a template code for it:
or set the image or an arbitrary HTML code for every menu item:
3.2. Modifying the content of the pages
The content of the pages can be modified from the Website->Management page in the admin panel. On this page, the administrator see the pages as a tree.
If the website is multi language, clicking on the flags to the top right of this page, will switch betweem management of the pages of the different language versions.
Please note that if you would like to modify the content of a page and the website is multi language, you need to do this for every language. For example modify the Contact page in the English version, then the Contacto page in the Spanish version etc.
To edit the content of a page like for example the Contact us page, the administrator has to click on it and then choose either Launch WYSIWYG editor or the Edit HTML code option.
With the second option, the administrator will be able to directly modify the html code of the page, while with the first, a WYSIWYG (what you see is what you get) editor will open, allowing to modify the content of the page.
Please note that the pages for which php files are set to be executed (the Set Custom Extension option) can't be modified directly with the WYSIWYG editor. These pages can be easily distinguished on the Website->Management page, near their name one could see with red font the name of the php file to be executed, for example for Jobseekers this is jobseekers.php.
The reason is that the code for these pages is rendered by the system, for example in the case of the Jobseekers page, it's generated by the file /extensions/jobseekers.php (which is the jobseekers sign up form), so the php code for it can't be modified with the WYSIWYG editor.
The page can be modified by editing directly the file for it or if only some texts need to be changed, this may be done by modifying the language file (/include/ui_texts_en.php for English) or if new fields have to be added, the administrator can use the pages in the admin panel for adding new custom fields.
3.3. Custom server side forms
The custom server side forms functionality is a feature allowing the administrator to create and publish on the front site forms (such as contact forms) with custom fields defined by the administrator. Adding a new custom server side form can be done on 2 steps - the first one is to enter the form name and a brief description and the second one is to add the form fields. For every field the administrator should specify its name, type, the text displayed near it, its size and if it's an obligatory field (available only for some of the fields) and the message which will show up if the user leaves empty an obligatory field.
The new forms can be added from the Tools → Create a new form page:
while the existing forms can be managed from the Tools → Manage the forms page in the admin panel.
The forms can be deleted, modified, copied (in order to copy forms on different pages on the front site) and also their settings can be modified.
The settings that can be modified are:
the form name (the name can be used for identification of the form, by default it doesn't show up on the website)
the form description
the text, which will show up on the submit button (like Send or Enviar etc.)
message displayed after the user has successfully submited the form
and also the email to which the forms data will be sent, the administrator can fill in this field his preferred email address to which the data sent by the users will be forwarded (it will be also available in the admin panel on the Tools → Posted Data page)
3.4. Languages and language files
The language files contain the text and words shown on the user interface. For every language there is one language file located in the /include folder.
The name and location of the language file is: /include/ui_texts_[CODE OF THE LANGUAGE].php
or for example /include/ui_texts_en.php for English. The language file contains the different messages as PHP variables, for example:
$M_HIDE_RECENT_SEARCHES="hide recent searches";
$M_CLEAR_ALL="clear all";
$M_SEE_ALL="see all";
$M_WEBSITE_HOME="Website Home";
Translating the language file consists of translating the messages enclosed in brackets to the right, for example for Spanish:
$M_HIDE_RECENT_SEARCHES="ocultar bsquedas recientes";
$M_CLEAR_ALL="borrar todos";
$M_SEE_ALL="ver todos";
$M_WEBSITE_HOME = "Sitio Web - Inicio";
In order to add a new language on the website, it's necessary to add the translated file in the /include folder and also the administrator has to use the form on the Language Versions page and enter the name of the new language for example Deutsch and the code for the new language, for example DE.
The language code shows up after in the page links and is also used to for the name of the language file (in this case the language file will be /include/ui_texts_de.php) and it's important to be 2 characters (like EN, DE, PT, TR etc).
4. Front site templates management
4.1. Templates overview
A template for the front site represents a standard html code mixed with some special WebSiteAdmin tags (in order to ensure compatibility with our other products, Jobs Portal uses the same type of templates as WebSiteAdmin).
When the page is rendered, these tags are replaced by the corresponding content.
Let's consider the following example:
<wsa title/>
...
When the page is rendered, for example the tag
will be replaced with the page title, so
<wsa title/> will become:
Page title goes here
etc.
Please note that presence of none of these tags is obligatory, so you could combine them as you wish in order to create the website and layout suiting the best your specific needs. Be aware also that WebSiteAdmin allows you to create your own tags (from the Custom tags in the back office) and set php files created by you to be executed and the generated content to be used in real time to replace the tag with it.
You may find below the list with the tags coming standard with the setup and default template:
- Title of the web page
- Meta description of the web page
- Meta keywords of the web page
- Main navigation menu of the website
- The languages menu of the website
- The main content of a page
- The custom server side forms for this page if there are any
- The main login form
- The quick search form on the fton site
- The news (the administrator can manage them from the News page in the ADMIN)
- The block displaying the featured ads
- The bottom menu displayed at the bottom of the site (it contains the same items as the main navigation menu)
You can do changes in the template currently in use, or add another ones from the Templates category in the back office.
4.2. Adding new templates and modifying the existing ones
In the Jobs Portal administration panel you may find the following pages related to the front site templates management:
Templates -> Select a Template
The page offers the possibility to the administrator to select a template which will be used for the front site between the currently available templates. Please note that in order to be able to select a template for a given website, you need to add first the template (if it doesn't still exist)
Templates -> Add a New Template
This page can be used to add new templates to the website. The administrator can add the new template by directly pasting its HTML code.
Templates -> Modify
On this page the administrator can see the available templates and modify a selected template. In order to select a template for modification, the administrator should click on the Modify icon and then a new text area having the full template code will appear.
4.3. Custom HTML tags
The system provides you the possibility to add your own PHP scripts and to extend in this way the available functionality. The mechanism of doing this is simple - the first step is to upload the corresponding PHP files in the ROOT/extensions. You have then the choice to use your files for your custom defined tags or to set them as extension for a selected page. To set a file as extension of an existing page you have to set this from Website → Management. If there is a script set as extension of a page, it will be executed when the page is rendered and its output will be shown in the main content area. Additionally you may set your scripts to be executed for a custom defined tag.
The tag should be defined from Extension → Tags and then inserted in the template or in the page content. When the page is rendered all the custom defined tags will be replaced by the content generated by the script you set.
5. Advertisements
5.1. Creating banner areas
This functionality provides the possibility for the administrator to define multiple banner areas on his website. Every banner area could have a maximum number of banners specified by the administrator. The administrator can also set the number of columns and rows of banners in this area as well as the banner size, the price for a banner to be listed in this area and how long (in days) it will stay online. From their personal admin space, the employers can choose the banner area where they would like to upload their banner (if the maximum number of banners allowed by the administrator for this area is reached, a SOLD OUT message will be displayed for the banner area and the agent won't be able to select it).
For every banner, the employer can upload the banner image as well as specify the banner link. There are two types of banner links supported - links leading to the property ads posted by the agent uploading the banner or links to external websites (such as the employer website etc.)
The banner areas can be managed by the administrator from the admin panel and the Settings → Banner areas page.
When creating a new banner area, the administrator is required to fill the following fields:
Name - the name of the banner area
Description - the description of the banner area, this description is visible for the users
Rows - the number of rows of banners in this area
Columns - the number of columns of banners in this area, for example if you enter 3 rows X 4 columns, the banners will appear in a table having 4 rows and 4 columns
Banner Width - the width in pixels of a banner placed in this area
Banner Height - the height in pixels of a banner placed in this area
Banner Price - the price paid by the employers for placing a banner in this area
Days Valid - the number of days for which the banner will appear on the website
The administrator can also modify the settings of a banner area from this page however the new settings (such as how many days the banners from this area will stay online) won't affect the existing banners, just the new ones added by the users.
The number of banner areas isn't limited, this means that the administrator can create as many banner areas as he wishes.
Important! For every banner area there is a correspondent tag which should be inserted in the template html code (from Templates->Modify in the admin panel).
The format of the tag is
. For example for the banner area with id #1 , it will be
, for id #2
, etc. These tags should be inserted in the templates code (from the Templates->Modify page) at the place where the banners will appear. When the website content is rendered, the tag
will be replaced with the html code of the banner area #1 .
5.2. Banners
The employer can upload new banners from his admin space, the Job Ads → Banners page.
When adding a new banner, during the first step the employer needs to select the banner area where he would like to place his banner (the list of the available banner areas appears at the top of the page). After that, on the new form that will open, the employer will be required to fill the following fields for the banner:
Name - the name of the banner, this name doesn't appear on the website, it's supposed to help the employer to easily identify its banner
Image - the banner image
Link Type - the type of the link, the employer has a choice between "Job Ads" and "External Link". If "My Listings" is selected, then when clicking on the banner the users will see the list of listings of this employer. When "Job Ads" link type is selected, there is no need to fill the last "Link" field in this form. The "External Link" should be used when the employer would like that when clicking on the banner, the users are redirected to an external website such as the employer website etc. If the employer selects the "External Link" option, he has to enter the link in the next field "Link"
Link - the link/url of the website (if the "External Field" option is selected). The urls should be in the following format: http://www.website.com
The administrator can also add banners to a selected banner area using the Settings->Banners page. When adding a banner, the administrator will have to specify additionally the username of the employer for whom he is adding the banner.
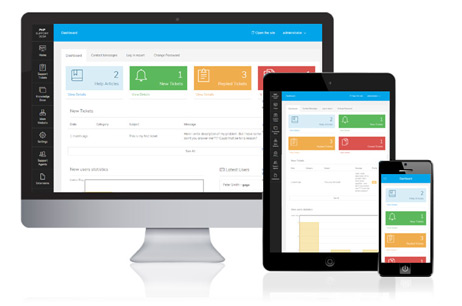
6. Administration Panel
7.1. General Overview
The administration panel is the main tool available to the Jobs Portal administrator to manage the website, change its settings, templates and design, pages content etc.
The features in the admin panel are divided in categories. The main administrator and the members of the Administrators group have access to all the categories and pages in them.
The Jobs Portal admin panel features are divided in ten groups:
- Home (welcome page, modification of password, connections and others)
- Users (management of the jobseekers, employers, job alerts, contact persons)
- Jobs (job ads - validation, packages, posting new ads)
- Settings (management of the categories, regions, banner areas and others)
- Website (front site structure and content management, navigation menu settings)
- Templates (front site templates management)
- Extensions (customextensions and extension files)
- Tools (image manager, custom server side forms)
- Statistics (reports, google, referrals)
- Security (management of the back office users, groups and permissions, security logs)
7.2. Main pages in the administration panel
You may find below the list of the main pages in the administration panel with their screen shot and a brief description of the features on the page.
Home → Welcome
Home page of the back office. On this page, the administrator could find links to the internal pages of the back office application allowing him to handle the job site and the different settings.
The Jobs Portal back office functionalities are divided in ten groups:
- Home (welcome page, modification of password, connections and others)
- Jobs (management of the jobseekers, employers, job alerts, contact persons)
- Ads (job ads - validation, packages, posting new ads)
- Settings (management of the categories, regions, banner areas and others)
- Website (front site structure and content management, navigation menu settings)
- Templates (front site templates management)
- Extensions (websiteadmin extensions and extension files)
- Tools (image manager, custom server side forms)
- Statistics (reports, google, referrals)
- Security (management of the back office users, groups and permissions, security logs)
Home → Connections
The administrator could see on this page a report about the connections to the back office application. The unsuccessful login attempts are displayed in a separate table, for each record the administrator can see the IP address and the date and time of the login attempt.
Home → Change Password
This page allows the user to change the password he use to access the back office. After the password is successfully changed, the user will have to login again with his new password.
Users → Employers
The administrator can manage the registered employers from this page. When the administrator opens the page, he will see a list with the current employers and a Modify icon near the name of each of them. One should click on the Modify icon in order to change the details of a selected employer.
Users → Jobseekers
The administrator can manage the registered jobseekers from this page. When the administrator opens the page, he will see a list with the current jobseekers and a Modify icon near the name of each of them. One should click on the Modify icon in order to change the details of a selected jobseeker.
Users → Contact Persons
The page allows the administrator to monitor the contact persons added by the employers and delete them if necessary.
Users → Jobseeker Fields
The page can be used by the administrator to add new custom fields for the jobseekers. For every new field the administrator has to enter its name, the size in pixels and the possible values if the field is a drop down selection menu. If the possible values field is left empty, the the new added custom field with be a text box allowing the user to enter a text value. The newly added fields show up after on the pages for modifying the profile (the Profile->Modify page in the jobseekers admin spaces) and also on the front site registration form.
Users → Employers Fields
The page can be used by the administrator to add new custom fields for the employers. For every new field the administrator has to enter its name, the size in pixels and the possible values if the field is a drop down selection menu. If the possible values field is left empty, the the new added custom field with be a text box allowing the user to enter a text value. The newly added fields show up after on the pages for modifying the profile (the Profile->Modify page in the employers admin spaces) and also on the front site registration form.
Users → Jobseeker Payments
If the website is configured to be paid for the jobseekers, the administrator can use the page to monitor and manage the jobseekers payments.
Jobs → Job ads
The page provides functionality to the administrator to view and modify the current job ads. The expired job ads appear in dark gray on this page.
When modifying an existing job ad, the administrator can change its title and message and also set it as active/not active or set if the email notification is active for it and finally for the ad is featured or not featured. The featured ads show in a special box on the home page if such tag for featured ads is present in the front site template.
Jobs → New Job Ad
This page allows the administrator to post himself new job ads on the job site.
Jobs → Create Packages
On this page the administrator can manage the job ad packages that have to be used by the employers to post job ads on the website. For every new package, the administrator should enter the number of ads, the validity of the ads in days (for example 15 - means that a job ad posted when using such package will be valid 15 days from the date it's posted on the website), the price of the job ads packages and if this package should be active or not (the not active packages will not appear in the employers admin area)
Jobs → Employer Packages
The administrator can see on this page, the currently available valid employers packages with the remaining ads number in them. (the employer should dispose of such a job ads package in order to be able to post new job ads on the website)
Jobs → Messages
The system allows the users (jobseekers and employers) to exchange messages between them. On this page, the administrator can see the list with the messages sent by the users and delete any of them if he wishes.
Jobs → Jobs Alerts
The job alerts present a way for the jobseekers to define some custom rules for email notification when a new job ad is posted meeting their search criteria. For example if the jobseeker is looking for a job in New York containing the word "java" in the job description, he may define such email notification rule from his personal administration space. Every time such job ad is posted on the website, the jobseeker will receive an email containing a direct link to the job ad on the job site. This page in the back office allows the administration to browse and manage the list of the currently defined job alerts by the jobseekers.
Jobs → Fields
The new custom job fields can be added from the Jobs->Fields page in the admin panel. The fields are similar to the pages for adding new custom fields for the jobseekers and employers.
Jobs → Applications
Jobs → Uploaded Files
On Uploaded Files in the admin panel, the administrator can see a list of the uploaded files of all the jobseekers. There is a link allowing to open a file for every file available and also an option to delete the files if necessary.
Settings → Configuration Options
On this page, the administrator can modify the different configuration options available for the website. The configuration options are described in details in chapter 2 of the manual.
Settings → Credits
On this page the administrator can manage some general settings for the credits system as well as set the prices in credits for the services.
The credits system makes easier for the employer the use of the different paid services on the website. When the employer is interested in using a particular service like posting a new job ad, making this ad featured, browsing the database with jobseeker resumes he wouldn't redirected every time to paypal (or using any of the other payment option) but directly pay with credits. The employer can purchase as many credits as he think that he will need for a selected time period (the prices for the services in credits are set by the administrator from the back office).
Settings → Categories
The administrator could use this page in order to modify the existing or enter new job categories. The job categories should be entered as a list in plain text.
Settings -> Regions
The job regions are handled in a similar way as the job categories, they should be entered as a list in plain text on the Settings -> Regions page.
Settings → Jobseeker Files
The system allows the jobseekers to upload files (such as references etc.) in their personal administration space and then attach these files when applying for a job. The administrator can define on this page some general settings for the uploaded files by the jobseekers such as the maximum number of files the jobseeker is allowed to upload as well as the maximum file size of the files in bytes.
Settings → Banner areas
The page provides functionality to the administrator to manage the banner areas on the front site.
When creating a new banner area, the administrator is required to fill the following fields:
Name - the name of the banner area
Description - the description of the banner area, this description is visible for the employers
Rows - the number of rows of banners in this area
Columns - the number of columns of banners in this area, for example if you enter 3 rows X 4 columns, the banners will appear in a table having 4 rows and 4 columns
Banner Width - the width in pixels of a banner placed in this area
Banner Height - the height in pixels of a banner placed in this area
Banner Price - the price paid by the employers for placing a banner in this area
Days Valid - the number of days for which the banner will appear on the website
Settings → Banners
The administrator can view and manage the banners uploaded by the jobseekers on this page as well as upload himself a new banner in a selected banner area.
Settings → Signup
When new employers or jobseekers sign up, they receive a welcome message containing an activation link for their account. On this page, the administrator can set the email address which will be used when sending these welcome messages as well as the email subjects and texts for both jobseekers and employers.
Website → Management
Jobs Portal is powered by a limited in functionality version of WebSiteAdmin. The website -> management page is one of the websiteadmin structure and content management related pages providing the possibility to freely edit the website structure (add/remove pages) and content (using WYSIWYG editor or directly modifying the page html). In order to edit the settings of a page (such as its title, meta tags etc.) one should select the page appearing in the site structure tree with a left mouse click. After that one needs to click with the right mouse of the button and a new context menu will appear with multiple options.
Website → Navigation menu
Two main types of navigation menus are available:
- Customized (it's possible with them to enter a template which will be used for every link or enter arbitrary html code or image which will be shown for the page's link)
-Standard (these menus are generated automatically according to the website structure defined by the administrator - they are multilevel and the administrator can fully customize their colors and appearance from the Settings link on this page)
Website → Language Versions
Jobs Portal is multi language and can support multiple languages. On this page the administrator can add a new language version or deactivate some of the current ones. Please note that when adding a new language version, one needs also to translate and add the corresponding language file for it.
Website → Website Style
From this page the administrator can change some general website style settings such as the default font color, the default links color etc. If the first field on this page "Disable these styles" is set to YES, the styles set on this page won't apply for the website.
Templates → Select a template
The page offers the possibility to the administrator to select a template which will be used for the front site between the currently available templates. Please note that in order to be able to select a template for a given website, you need to add first the template (if it doesn't still exist)
Templates → Add a new template
This page can be used to add new templates to the website. The administrator have a choice to choose between the option to add the template using the WYSIWYG templates editor (which produces simple template) or to directly paste the template html code.
Templates → Modify
On this page the administrator can see the available templates and modify a selected template. In order to select a template for modification, the administrator should click on the Modify icon and then a new text area having the full template code will appear.
Extensions → Extension Files
The extensions and custom tags, provide an universal way to expand the default functionality. The so called extensions represent regular php files which output html code. So one could create a new extension just as writing a standard php file. In order to set this file to be executed on a selected page (and the correspondent content to be rendered) the administrator needs to go to Website->Management, then select a page with a left mouse click and then right click and a new context menu will appear having the different options.
Extensions → Tags
The difference between a custom tag and an extension is that a custom tag can be plugged in the template's code and then set some extension file to be executed for it. In such way, every time the system finds such a custom tag in the template's html, it will execute the extension file and replace the associated tag with html rendered by the extension file.
Tools → Image Manager
The image manager could be useful for quick review of the available images on the website (including these uploaded by the users). The administrator is able to delete some of the images if he wishes.